How Contractors Can Explain Manual J, Manual S, and Manual D Without Losing the Homeowner
A practical way to turn load calculations, equipment selection, and duct design into a clear homeowner conversation that builds trust instead of confusion.
Many homeowners have never heard of Manual J, Manual S, or Manual D until they are comparing HVAC proposals. When they do hear those terms, they often assume they are either unnecessary technical jargon or a sales tactic to justify a higher price. That creates a challenge for contractors who are doing the job the right way. You know these steps matter because system comfort, efficiency, airflow, noise, humidity control, and equipment life are all affected by proper design. The homeowner, however, may only hear a string of unfamiliar words.
The good news is that this is usually not a technical problem. It is a communication problem. The contractor who can explain Manual J Manual S Manual D in plain language can stand out from competitors who skip design steps or bury them in paperwork. When homeowners understand what you are doing and why you are doing it, they are more likely to trust your recommendations, compare bids more fairly, and appreciate the value behind a properly designed installation.
This article gives you a practical framework for that conversation. It focuses on how to explain each manual clearly, how to connect them in a logical sequence, how to answer common objections, and how to use the discussion to strengthen your sales and installation process. Local requirements vary, so use this as a communication guide and verify any local code, program, or permitting expectations in your market.
Simple language wins. Most homeowners do not need every calculation detail. They need to understand that you are measuring the home, matching the equipment to the home, and making sure the air can move through the home the way the system was designed to perform.
What homeowners think they are buying
Before you explain the manuals, it helps to understand the homeowner mindset. Most customers think they are buying a box. They see the outdoor unit, the indoor unit, the thermostat, and a quoted efficiency rating. If they are replacing an existing system, they may assume the main decision is choosing a brand or matching the same tonnage they already have.
What they are really buying is system performance in their home. They are buying even temperatures from room to room, manageable humidity, reasonable sound levels, predictable operation, and fewer comfort complaints after the install. Those results do not come from equipment alone. They come from design, selection, and airflow.
That is why your first step is often reframing the conversation. Instead of starting with model numbers, start with outcomes. You might say that the goal is not just to install a new unit. The goal is to make sure the system is sized for the house, matched to the load, and connected to ductwork that can deliver the airflow the equipment needs. Once the customer understands that, the manuals begin to make sense.
It also helps to remind homeowners that replacing old equipment based only on the existing nameplate can repeat old mistakes. If the original system was oversized, undersized, or paired with poor duct design, installing the same size again may preserve the same comfort problems. That point often opens the door to a better conversation about why a real design process matters.
What Manual J means in plain English
Manual J is the load calculation. In plain language, it estimates how much heating and cooling the home needs under design conditions. This is where you explain that houses do not all need the same size equipment, even if they look similar from the street. Square footage matters, but so do insulation levels, window area, window orientation, air leakage, ceiling height, occupancy patterns, and local climate conditions.
A homeowner-friendly way to describe Manual J is to call it the step where you measure how much heat enters and leaves the home. In cooling mode, the house gains heat through walls, windows, roof surfaces, infiltration, appliances, and people. In heating mode, the house loses heat through the building envelope and air leakage. Manual J helps estimate that demand so the system can be sized to meet the home rather than guess at it.
Keep your explanation away from dense terminology unless the customer asks for it. Most homeowners do not need a lecture about sensible and latent loads, but they do benefit from hearing that cooling is not only about dropping temperature. It is also about removing moisture. If you are in a humid climate, that point can be especially useful when explaining why bigger is not always better.
One of the most effective phrases in this conversation is that oversized equipment can cool a house too quickly without running long enough to manage humidity well. That gives homeowners a practical reason to care about sizing. They may have experienced a home that felt cold but clammy, or a system that cycled on and off frequently. When you connect Manual J to real comfort issues, it stops sounding abstract.
You can also explain what Manual J is not. It is not a guess based on the old unit size. It is not a rule of thumb based only on square footage. It is not just for custom homes. It is a structured way to determine the load of the home you are standing in. Even when software performs the calculation, the quality of the inputs still matters. That is another reason your field data collection matters.
If the homeowner asks what information you need, this is a good moment to show professionalism. Tell them you may look at window sizes and types, insulation assumptions, orientation, number of rooms, duct location, and other building details. That communicates that you are evaluating the house as a system, not just pricing equipment from the driveway.
How to explain Manual S without getting too technical
Once the homeowner understands that Manual J finds the load, Manual S becomes easier to explain. Manual S is the equipment selection step. In simple terms, it is how you take the load information and choose equipment whose actual performance matches the home’s needs as closely as possible.
This is where many contractors lose the homeowner by talking only in nominal tonnage. Homeowners hear three ton, four ton, or five ton as if every system in that category performs the same way. They do not. Performance changes based on equipment combination, airflow, installation details, and design conditions. A better explanation is that Manual S helps select equipment based on how it will actually perform in this application, not just what the label says.
You can frame it like this: Manual J tells us how much heating and cooling the home needs, and Manual S helps us choose the equipment that can deliver that capacity under real conditions. This is a strong moment to explain why two systems with the same advertised size may not be equally suitable for the same house.
Homeowners also respond well when you connect Manual S to comfort goals. If a customer has concerns about humidity, noise, hot rooms, or shoulder-season performance, explain that equipment choice affects those outcomes. Capacity staging, airflow characteristics, and equipment matching all influence how the system behaves once installed. You do not need to turn that into a technical seminar. You only need to show that equipment selection is more than picking a brand and a size.
This is also a good place to discuss replacement situations where the homeowner expects a one-for-one swap. You can explain that if the old system was selected with limited analysis, simply replacing it with the same nominal size may miss an opportunity to improve comfort and efficiency. Sometimes the right answer is the same size. Sometimes it is not. The point is that the decision should come from the home’s needs, not habit.
When you present options, tie each one back to the design process. Instead of saying this is the better unit because it costs more, say this option better matches the load profile, offers features that may improve comfort in your home, or provides performance characteristics that fit the airflow and operating needs of the house. That keeps the conversation grounded in design rather than price alone.
Why Manual D matters even when the equipment is good
Manual D is the duct design step, and this is often the most overlooked part of the conversation. Many homeowners assume that once the right equipment is selected, the rest takes care of itself. Contractors know that is not true. A well-chosen system can still underperform if the ductwork cannot deliver the required airflow properly.
The easiest way to explain Manual D is to say that it is the step that plans how air will move through the house. If Manual J measures what the house needs, and Manual S chooses equipment to meet those needs, Manual D helps ensure the conditioned air can actually get where it is supposed to go in the correct amount.
Homeowners usually understand this quickly when you relate it to familiar complaints. One room is always too hot. Another room never seems to get enough air. The hallway is noisy when the system starts. Some rooms feel drafty while others feel stagnant. Those issues often point to airflow and duct design problems, not just equipment problems.
Keep your language practical. Explain that ducts need to be sized and laid out so the system can move the right amount of air with manageable resistance. Poorly designed duct systems can contribute to low airflow, noise, comfort imbalance, and reduced performance. This is why a contractor who checks static pressure, reviews duct paths, and evaluates supply and return design is often bringing more value than one who only quotes equipment.
For replacement jobs, it is especially important to set expectations. Some homeowners believe existing ducts are automatically fine if air is coming out of the grilles. That is not a reliable standard. Existing ducts may be undersized, leaking, poorly routed, poorly insulated, or simply mismatched to the new system’s airflow needs. You do not have to promise a full duct renovation on every job, but you should explain that ductwork deserves evaluation rather than assumption.
When budget is tight, this is also where your communication skills matter. If full duct upgrades are not feasible right now, be honest about what the system can and cannot do with the current ductwork. Explain likely limitations and prioritize the improvements that may deliver the biggest impact. Clear expectations can prevent future callbacks and frustration.
How the three manuals work together
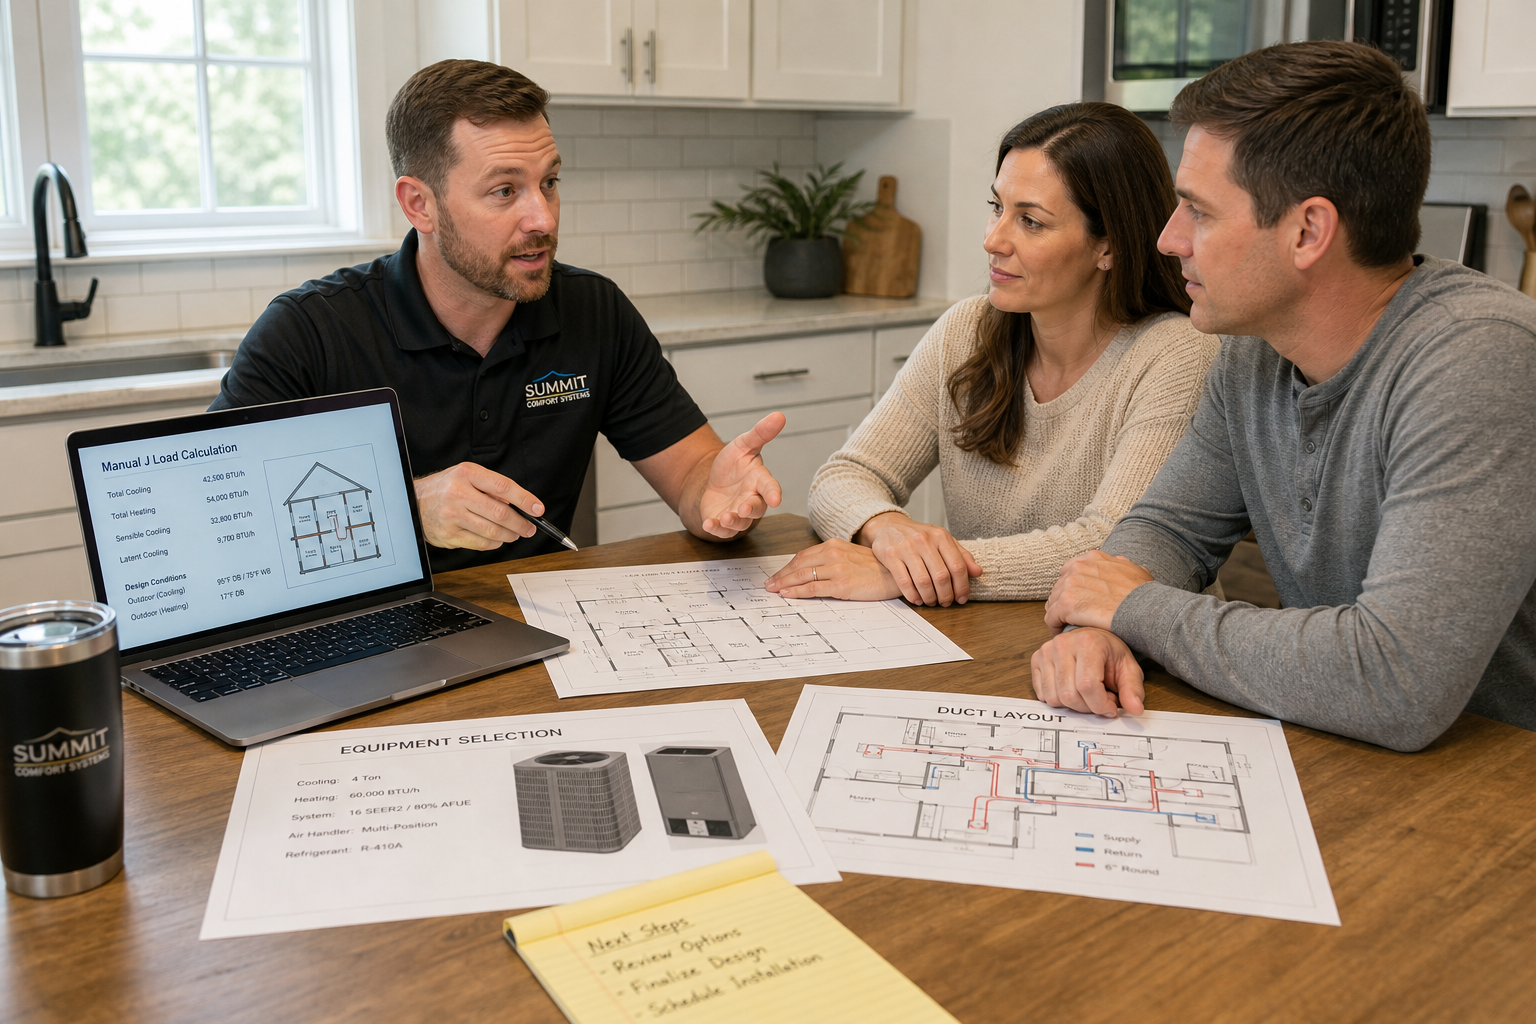
The real power of explaining Manual J Manual S Manual D is showing that they form a sequence. Homeowners understand processes better when they can see the order. First, you determine what the house needs. Second, you choose equipment that can meet those needs. Third, you make sure the duct system can deliver the air properly.
A simple line many contractors can use is this: load first, equipment second, airflow third. That is not a technical deep dive, but it gives the customer a memorable structure. It also lets you explain why skipping any one step can create problems. If you skip Manual J, you may start with the wrong target. If you skip Manual S, the chosen equipment may not match the target well. If you skip Manual D, the system may struggle to deliver the performance the design intended.
This sequence is also useful when comparing your proposal to lower-priced bids. You do not need to criticize competitors directly. Instead, explain your own process. Tell the homeowner that a proper installation is not just equipment replacement. It is a design-based approach that aims to reduce guesswork and improve real-world results. Customers who are looking carefully will usually recognize the difference.
Another practical tactic is to use visual aids. A one-page diagram, a tablet screen, or a marked-up floor plan can make the process feel tangible. Show where the load comes from, where the equipment choice fits in, and where duct layout affects room-by-room comfort. Even a simple sketch can make a technical concept easier to trust.
Homeowners do not need perfection in the explanation. They need confidence that you have a method. When they see that your recommendations are connected to a clear process, you become easier to believe and easier to recommend.
Common homeowner objections and better answers
Objections are often signs that the homeowner still sees HVAC as a box replacement instead of a system design problem. Your job is to answer without sounding defensive.
If a homeowner says the old system was the same size and worked fine, a better answer is that many homes can be heated or cooled by more than one size on paper, but comfort, humidity control, cycling behavior, and airflow can still differ. Rechecking the load helps confirm whether repeating the old size makes sense or whether there is a better fit.
If a homeowner says another contractor did not mention any of this, avoid attacking the competition. Say that contractors have different processes, but your company believes proper system design helps reduce guesswork and supports better comfort and performance. That answer stays professional and reinforces your value.
If the homeowner says they only want the cheapest replacement, it helps to separate first cost from total outcome. Explain that the lowest installed price may not account for sizing accuracy, airflow verification, or duct concerns. Then relate that to the homeowner’s goals. If they want fewer comfort issues after installation, design work matters.
If they ask whether this is required, be careful and factual. Local requirements vary by jurisdiction, project scope, and program rules. Do not make blanket claims. Instead, say that regardless of local paperwork requirements, using a sound design process is a best practice for matching the system to the home.
If they say they do not want to pay for calculations, explain that the design work is part of making an informed recommendation, similar to measuring before cutting. Some contractors bundle this effort into the project, while others separate it. Either way, it represents time and expertise that supports the quality of the final installation.
- Lead with homeowner outcomes, not technical labels.
- Use plain language such as house needs, equipment match, and airflow delivery.
- Avoid rule-of-thumb sizing language unless you are explaining why it is limited.
- Connect design steps to comfort, humidity, noise, and room balance.
- Be honest when existing ductwork may limit results.
- Explain your process without insulting competitors.
- Remind customers that local requirements vary and should be verified.
How to build this into your sales process
Explaining Manual J Manual S Manual D gets easier when your sales process supports it consistently. If every comfort advisor or estimator presents it differently, homeowners may get mixed messages. A repeatable process creates clarity for both your team and the customer.
Start by developing a short, standard explanation your team can use in the home. It should be brief enough to remember and natural enough to fit different personalities. For example, your team might say that they first determine what the house needs, then choose equipment that matches those needs, and then verify that the duct system can move the right amount of air. That sentence alone can improve the quality of many sales conversations.
Next, make the process visible. Include a design or system evaluation line item in your proposal notes. Mention what information was reviewed. If duct limitations were found, describe them clearly. If room comfort issues were discussed, show how your recommendations relate to those concerns. Written documentation helps homeowners compare proposals on more than price.
Photos can help here as well. A picture of restrictive returns, damaged ducts, disconnected sections, or poor transitions can make airflow concerns real. Homeowners may not understand static pressure readings, but they do understand visible problems. The more you can connect your recommendations to evidence in the home, the stronger your position becomes.
Training matters too. Your installers and service technicians should understand the same message, because they often reinforce or weaken what the salesperson said. If the install crew arrives and talks as if the project is just a simple box changeout, the homeowner may question why design considerations were discussed in the first place. Consistency across the team builds trust.
Finally, know when to go deeper and when to stop. Some homeowners want detailed explanations and will appreciate seeing reports or outputs. Others only want the practical summary. Read the room. The goal is not to prove how much you know. The goal is to help the customer feel informed enough to make a confident decision.
Frequently asked questions
Do homeowners really care about Manual J, Manual S, and Manual D?
Most homeowners do not care about the terms themselves, but they do care about comfort, humidity, noise, and whether the new system solves ongoing problems. When you connect the manuals to those outcomes, the conversation becomes relevant.
How much technical detail should a contractor share?
Usually less than you think. Start with a simple explanation and add detail only if the homeowner wants it. Too much jargon too early can make the process feel confusing or sales-driven.
What if the existing ductwork is staying in place?
Even if the ducts are not being fully replaced, they should still be evaluated. Existing ductwork may support the new system well, or it may introduce airflow limitations that affect results. Be clear about what you found and what that means for expected performance.
Can a contractor use this conversation to justify a higher price?
The better approach is to justify a better process, not just a higher price. When you explain your design steps clearly, the homeowner can see what is included in your proposal and why it may differ from a bid that only lists equipment.
Should contractors promise perfect comfort if they use these methods?
No. A proper design process improves decision-making and helps reduce avoidable problems, but every home has its own conditions and constraints. Be careful with absolutes and set realistic expectations, especially when existing building or duct issues remain.
Final thoughts
For contractors, Manual J, Manual S, and Manual D are not just technical references. They are a way to show homeowners that your company follows a thoughtful process instead of making a quick guess. The key is not to impress customers with terminology. It is to translate the design process into clear benefits they can understand.
When you explain that you are measuring what the house needs, selecting equipment to match those needs, and checking that the air can move through the house correctly, the homeowner begins to see the installation differently. It is no longer just a piece of equipment with a price tag. It is a comfort system designed for their specific home.
That shift can improve close rates, reduce misunderstandings, and support better project outcomes. In a market where many bids can look similar on the surface, your ability to explain the why behind the work may be one of the most practical advantages your business can develop.
Join the HVAC Installer Network
Create an installer listing to help homeowners discover your business, learn about your services, view your company information, and connect with you about installation opportunities in your service area.
This article is for general informational purposes and is intended for HVAC contractors. Local code, permitting, utility program, and documentation requirements vary by location and project type. Always verify current manufacturer data, design guidance, and local requirements before making equipment selection or installation decisions.